
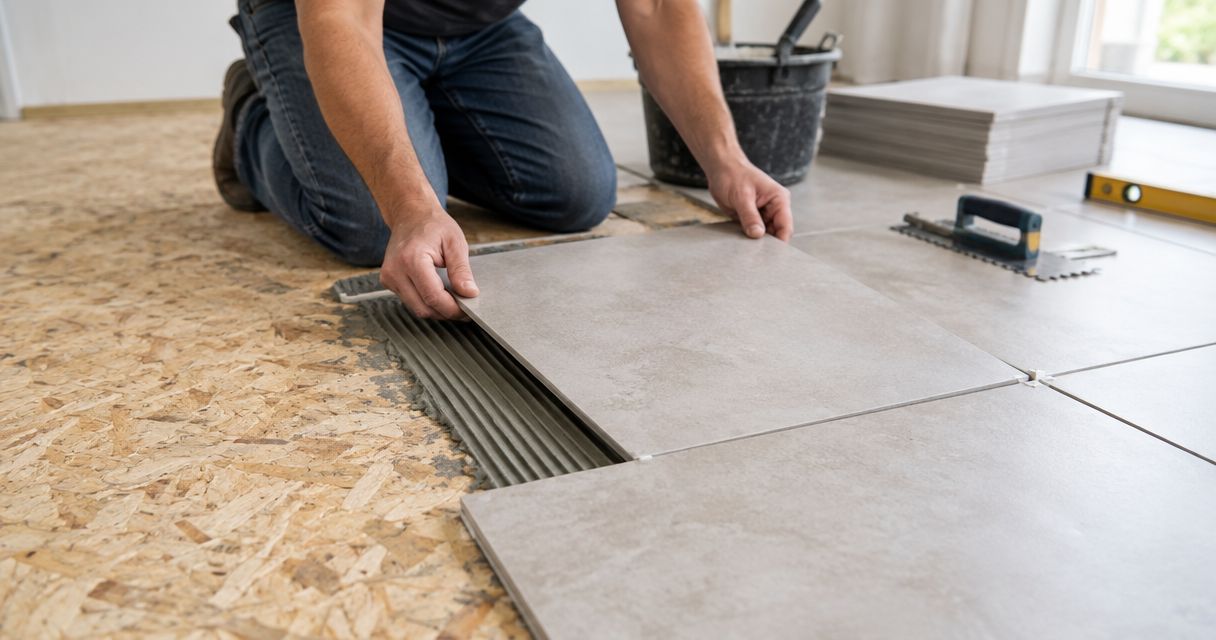
Yes, you can tile over particleboard flooring when the floor is sound and the complete tiling system explicitly allows that substrate; do not assume you can glue tiles straight onto the board. For a Melbourne renovation in 2026, check floor movement, moisture damage and the required underlay before laying tiles, and treat bathroom waterproofing as a separate part of the job.
- Can you tile over particleboard flooring? Yes, but only with a suitable, documented tiling system over a sound floor.
- Replace swollen or deteriorated particleboard before tiling; underlay does not repair damaged flooring.
- Bathroom waterproofing and tile underlay do different jobs. Neither fixes a floor that moves.
- Melbourne Tiling Group provides floor tiling services for Melbourne homeowners and construction companies.
Can you tile over particleboard flooring?
You can retain suitable particleboard beneath a tiled floor, but the board’s condition and the installation system decide whether that approach works. Particleboard is not interchangeable with concrete or structural plywood. An adhesive labelled for timber floors does not automatically cover every timber-based sheet.
Melbourne Tiling Group provides wall and floor tiling services for residential and commercial projects. Before you choose tiles, establish whether the existing floor can support the proposed finish.
| Approach | Best for | Main advantage | Main limitation |
|---|---|---|---|
| Retain sound particleboard beneath an approved tiling system | Floors confirmed suitable for the proposed assembly | Keeps a serviceable subfloor in place | Requires compatible preparation, underlay and fixings |
| Replace unsuitable particleboard before tiling | Swollen, deteriorated or otherwise unsuitable flooring | Removes a defective layer | Adds removal and rebuilding work |
| Bond tiles directly to particleboard | Only installations expressly permitted by the complete system’s written instructions | Avoids an additional layer where specifically allowed | A general-purpose adhesive claim is not sufficient approval |
Do not select the last approach simply because it looks quicker. If the written instructions do not cover your particleboard floor, do not treat direct bonding as an accepted shortcut.
Why this matters
Tiles and grout need a stable base. Particleboard can swell when exposed to moisture, while movement in a suspended floor can place stress on the tiled finish.
Covering a problem does not remove it. A floor that feels springy, has raised sheet edges or shows water damage needs investigation before preparation starts.
For your 2026 renovation, settle the substrate question before ordering the finished floor. That lets you plan door clearances, adjoining flooring and bathroom drainage around the actual floor build-up rather than a guess.
Retaining particleboard: suitable only after inspection
Keeping an existing floor makes sense when it is dry, sound, properly supported and accepted by the selected installation system. Start by identifying the sheet material rather than relying on its colour or appearance alone.
Check accessible product markings and construction records. Ask the installer to inspect sheet joints, fixings and the supporting structure, particularly around areas that move underfoot.
The benefit is straightforward: you keep material that remains fit for purpose. The limitation is equally clear: existing particleboard does not become suitable merely because someone can screw underlay over it.
A south-east Melbourne kitchen renovation, for example, needs the floor assessed before new cabinetry and tiles lock in finished heights. Coordinate the work so repairs remain accessible.
Replacing particleboard: necessary when the base is unsuitable
Replace damaged flooring rather than hiding it beneath a new finish. Swollen edges, crumbling material, soft patches and persistent dampness are reasons to stop and investigate.
Find the moisture source before replacing sheets. Otherwise, a new substrate remains exposed to the same problem.
Replacement gives you access to inspect support and address defects. It also adds work, so the scope should distinguish local sheet repairs from wider structural repairs instead of treating them as the same task.
Do not assume every particleboard floor needs removal. Equally, do not retain damaged sheets just to avoid demolition; the decision belongs to the floor assessment and the proposed system.
Why the preparation varies
The right preparation depends on the existing floor and the room, not just the tile you like. These factors change the work required:
- Floor condition: swelling, deterioration and damaged sheet edges need attention before covering.
- Support and movement: loose sheets and structural deflection require different repairs; tile underlay is not a structural fix.
- Room exposure: bathroom floors need wet-area detailing that a dry living-room floor does not.
- System compatibility: the substrate, underlay, adhesive and any membrane must work together under their written instructions.
- Finished height: extra layers affect doors, thresholds, adjoining rooms and fittings.
- Surface requirements: the selected tile and installation method determine the necessary flatness and preparation.
For a 2026 bathroom project, ask for a written preparation scope. A description such as ‘prepare floor and tile’ leaves too much unclear about repairs, underlay and waterproofing.
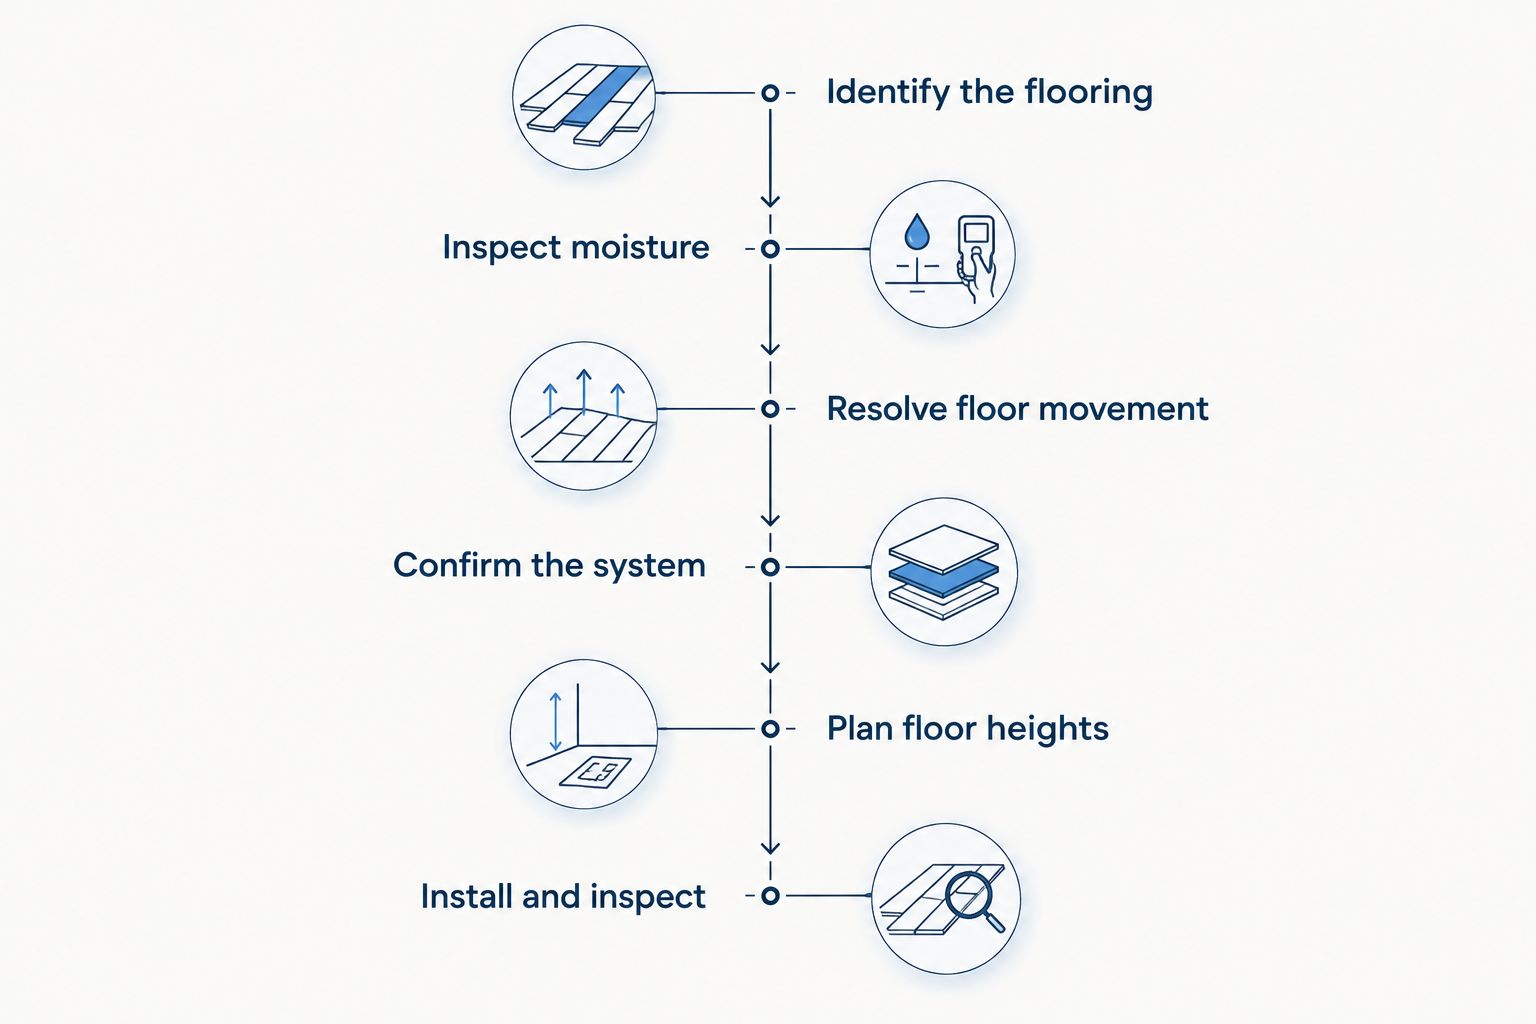
How to prepare particleboard flooring for tiles
Follow this sequence before laying the finish. Do not move to the next stage while an earlier problem remains unresolved.
1. Identify the flooring
Confirm that the floor is particleboard and identify the product where possible. Note old floor coverings, adhesive residues and any previous repairs.
Do not sand or grind unidentified old flooring materials. Arrange assessment for hazardous materials before disturbing suspect layers.
2. Inspect moisture and damage
Check around plumbing, appliances, external doors and previous leak locations. Look for staining, raised joints, softness and damaged sheet edges.
Appearance alone does not establish that a floor is dry enough. Follow the selected system’s requirements for substrate condition and moisture assessment.
3. Resolve floor movement
Have loose fixings, inadequate sheet support and movement investigated. The repair must address the cause, not merely quieten a squeak.
A tiling underlay provides a suitable receiving surface when used as specified. It does not turn an inadequately supported floor into a structurally adequate one.
4. Confirm the system
Choose an assembly whose written instructions expressly cover the existing substrate and intended room. Check the underlay, fixing method, joint treatment, adhesive and membrane requirements together.
Do not substitute components because their descriptions sound similar. If the instructions are unclear about particleboard, get written clarification from the relevant system supplier before installation.
5. Plan floor heights
Account for every proposed layer before fixing underlay or adjusting doors. Check transitions, appliance clearances and bathroom drainage details.
Where levelling is needed, use a preparation method approved for the substrate and assembly. A levelling compound is not a substitute for repairing a moving floor.
6. Install and inspect
Install each layer in the specified sequence, including required joint treatment and movement joints. Observe the stated drying and curing conditions before covering the next layer.
For a bathroom, inspect waterproofing details before tiles conceal them. Keep product information and installation records with your renovation documents.
The sequence matters because each stage depends on the layer below it. Fix damage and movement before installing a tile-ready surface, not afterwards.
Does tile underlay waterproof a particleboard bathroom floor?
Tile underlay is not, by itself, a complete bathroom waterproofing system. Its role is to provide the specified surface beneath the tiled finish; waterproofing must manage water at the required floor areas, junctions and penetrations.
Tiles and grout are not a substitute for that waterproofing. Water management also depends on details such as drainage, shower junctions and connections around pipes.
Do not choose a membrane independently of the floor assembly. Confirm its compatibility with the substrate or underlay, the adhesive and the intended wet-area use.
For a 2026 bathroom renovation, agree who is responsible for preparation, waterproofing and inspection before work starts. That avoids a gap between the person preparing the floor and the person installing the tiles.
What should you ask before accepting a tiling quote?
Ask the installer to describe the layers and repairs, not just the finished tile area. A useful scope tells you what stays, what comes out and what happens if damaged flooring is uncovered.
Use these questions when comparing the work:
- Will you retain the particleboard, and what establishes that it is suitable?
- Which written installation instructions cover this floor?
- What repairs and underlay installation are included?
- Who handles bathroom waterproofing and its junction details?
- How will the finished floor meet adjoining rooms and doorways?
- How will additional repairs be documented before they proceed?
Melbourne Tiling Group is a fit for Melbourne homeowners seeking wall and floor tiling installation. That service scope does not remove the need to establish whether your existing particleboard can stay.
Affordable planning means comparing the same work. A scope that excludes damaged-sheet replacement is not equivalent to one that includes it.
Discuss your floor tiling project
Describe the existing floor, room use and any moisture damage before planning the tiling work.
Can you tile over moisture-resistant particleboard?
Moisture-resistant particleboard is not waterproof, and the label does not automatically make it suitable for direct tiling. Check the flooring product’s instructions alongside the complete tiling system’s requirements.
Existing swelling or deterioration still needs investigation. A moisture-resistant designation does not reverse damage already present in the board.
Can you put cement sheet over particleboard and then tile?
Yes, a specified tile-underlay system can sit over suitable particleboard when its instructions permit that installation. Use the required bedding, fixings, joint treatment and tile adhesive rather than treating the sheet as a loose cover.
The limitation is structural. Cement-based tile underlay does not repair inadequate support or remove movement originating below the particleboard.
Should you replace particleboard before tiling a bathroom?
Replace particleboard that is damaged or unsuitable for the proposed bathroom assembly. Sound particleboard does not automatically require removal, but retaining it requires confirmation that the complete wet-area system permits it.
Make that decision before plumbing details and finished heights are fixed. Rebuilding the floor can affect drainage and the junction with adjoining rooms.
FAQ
Can I glue floor tiles straight onto particleboard?
Do not glue floor tiles straight onto particleboard unless the complete installation system expressly permits it. A general claim that an adhesive suits timber does not establish suitability for your particular particleboard floor.
Will flexible tile adhesive stop a particleboard floor from cracking?
Flexible tile adhesive does not repair a moving or damaged particleboard floor. Resolve support, fixing and substrate problems before selecting the adhesive.
Can I tile over particleboard that got wet but has dried?
Drying alone does not establish that previously wet particleboard is suitable for tiling. Inspect it for swelling, loss of strength and damaged joints, and address the original moisture source.
Is particleboard the same as plywood for tiling?
Particleboard and plywood are different substrates, so approval for plywood does not automatically cover particleboard. Check the exact substrate named in the installation instructions.
Can I use a decoupling membrane instead of tile underlay?
Use a decoupling membrane over particleboard only when its installation system expressly permits that substrate and application. The membrane does not remove the need for a sound, adequately supported floor.
How long should I wait before tiling over a prepared floor?
Follow the drying and curing requirements for the actual preparation products and site conditions. Do not apply a single waiting period to underlay bedding, levelling compounds and waterproofing membranes.
What should I check before booking floor tiling in 2026?
Check the floor condition, the proposed layer sequence and responsibility for repairs before booking floor tiling in 2026. For bathrooms, also confirm waterproofing, drainage details and the records you will receive.
One last thing
A sound-looking surface can hide a problem at the sheet edges or underneath the floor. Ask for the substrate decision before approving the tile layout, especially where old cabinets or bathroom fittings have concealed leaks.
Keep a record of the floor before it is covered. Photos of repairs, product details and the agreed layer sequence are more useful than trying to identify hidden materials after a problem appears.


