

Property developers’ kitchen tiling is the planning and installation of kitchen tiles with the aim of delivering durable, consistent finishes across a development. Unlike a single-home renovation, your brief must also control repeat selections, trade access, variations and handover standards across multiple kitchens.
- Kitchen tiling for property developers starts with a repeatable specification, confirmed surfaces and agreed trade responsibilities.
- Melbourne Tiling Group suits developers needing kitchen wall and floor tiling services in Melbourne.
- Approve tile layouts, splashback edges and floor transitions before installation, not during it.
- Choose tiles and grout for cleaning, maintenance and installation requirements—not appearance alone.
Why kitchen tiling matters for property developers
A kitchen combines several trades in a small working area. Cabinet dimensions, benchtop heights, plumbing outlets and electrical fittings all affect where tiles start, stop and need cutting. An unresolved detail in a display kitchen becomes a repeated problem when the same layout reaches other dwellings.
Your 2026 tiling brief should define the finished result and who prepares each surface. A tile selection alone does neither. Record the work needed underneath the tiles, the visible junctions and the inspection points before asking contractors to quote.
Melbourne Tiling Group provides residential and commercial wall and floor tiling services, including kitchen tiling, in Melbourne. The service is relevant when your development needs installation rather than selection advice alone.
For projects in Melbourne’s south-east, put the actual suburb, access conditions and site contact into the brief. Do not leave contractors to infer site arrangements from a floor plan.
How to plan kitchen tiling from brief to handover
1. Define the kitchen types and finish requirements
Start with your drawings and a simple spreadsheet. Group kitchens by layout and finish, then identify exceptions such as an accessible kitchen, a different island arrangement or a kitchen opening onto an outdoor area.
Use 1 specification sheet per kitchen type as a planning rule. This gives the builder, supplier and installer a shared reference without forcing them to search through unrelated selections. Name the approved revision so an old sample photograph cannot override a later decision.
For a 2026 development, describe the intended use plainly: owner-occupied homes, rental dwellings or another confirmed project brief. Choose maintenance requirements that suit that use rather than assuming every buyer wants a feature finish.
- Record the tile reference, finish and intended location.
- Identify kitchens that share the same specification.
- Mark layout exceptions directly on the relevant drawing.
- Nominate who approves substitutions and revised details.
2. Measure the full scope, not just the tiled area
Measure from current drawings first, then confirm dimensions on site before ordering or cutting. Separate floor tiling from splashbacks because their preparation, edges and installation sequence differ.
A useful scope records more than square metres. Exposed ends need a finishing detail, floor junctions need coordination, and an uneven base needs assessment before tiles conceal it. Treat preparation as a named work item rather than an assumption inside the installation allowance.
The scope should show these five parts together. Missing one leaves a decision for someone else to make on site.
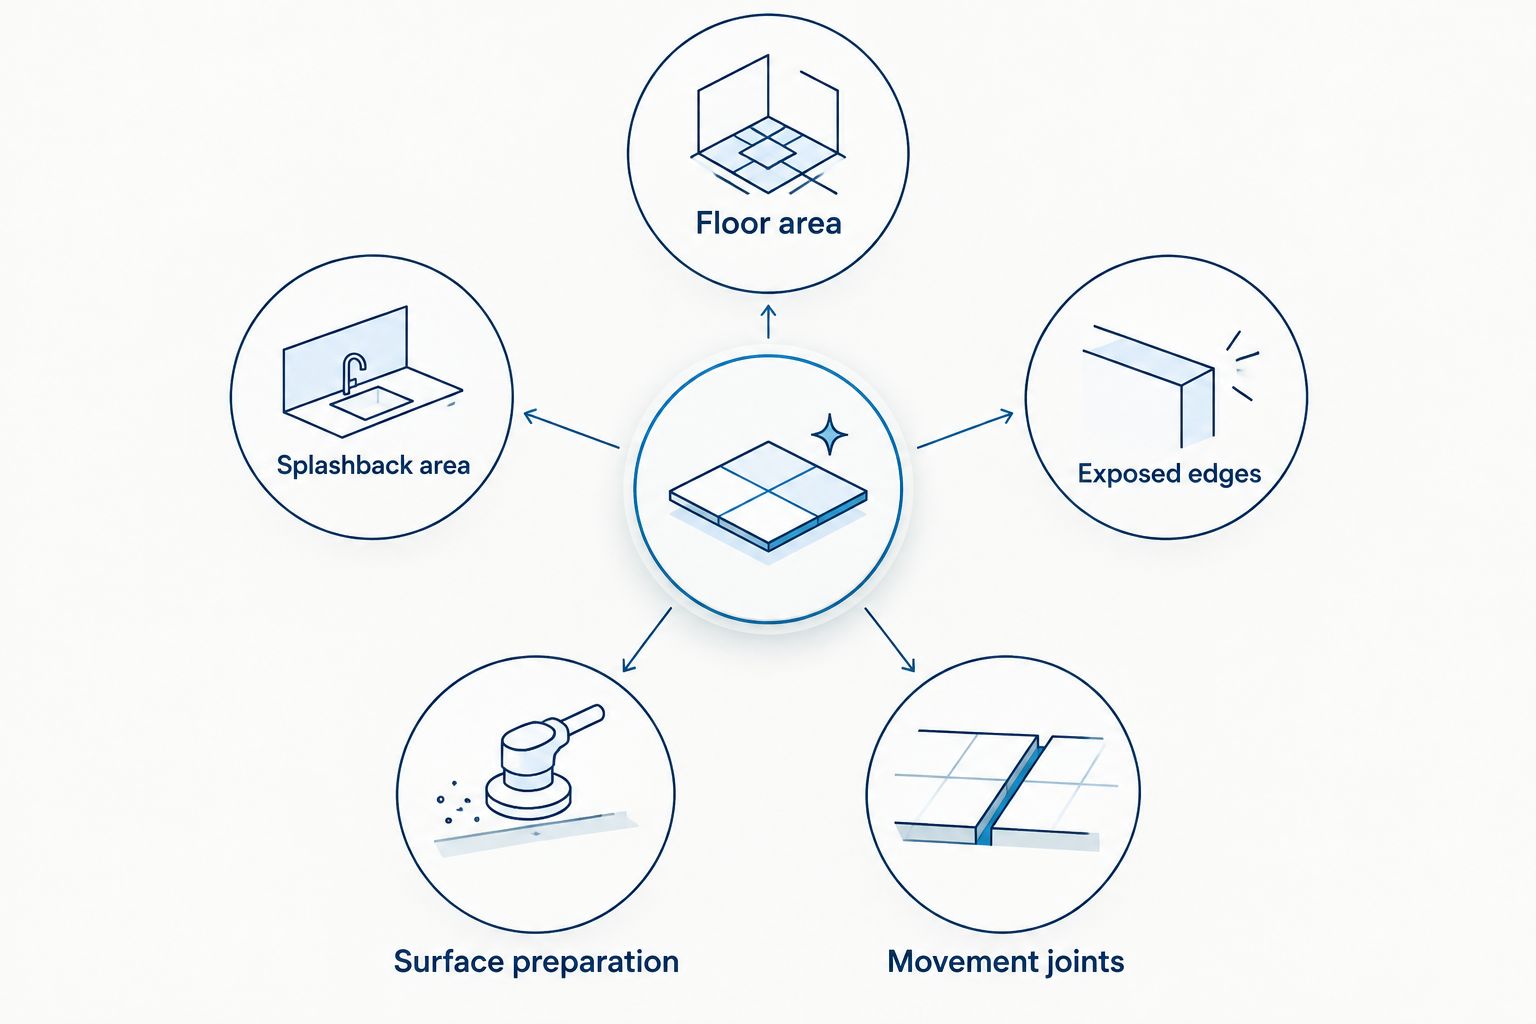
Check measurements against cabinet and benchtop drawings before treating the scope as ready for tender. For finishes under consideration, compare the practical differences in kitchen splashback materials before finalising the specification.
- Floor area: mark boundaries, cabinet footprints and adjoining finishes.
- Splashback area: confirm heights, returns and interruptions.
- Exposed edges: specify the agreed trim or finished edge.
- Surface preparation: identify assessment, repair and levelling responsibilities.
- Movement joints: have the installer identify required locations and treatment.
3. Select tiles around installation and maintenance
Begin with physical samples and the supplier’s technical information. Check the intended application, cleaning requirements and installation instructions, then review the sample alongside cabinetry and benchtops.
Porcelain, ceramic and natural stone are not interchangeable specifications. Suitability depends on the particular tile, finish and location. Natural stone needs a stone-specific assessment of sealing, cleaning and installation requirements; a sample’s appearance does not answer those questions.
For Melbourne Tiling Group kitchen tiling enquiries, provide the proposed tile details with the drawings so the installation discussion starts with a defined material. Best for developers with selections underway: this keeps the conversation focused on the actual wall and floor work. Confirm preparation, material supply and other responsibilities separately; do not assume they form part of every installation scope.
- Check that each selected tile suits its wall or floor application.
- Request installation and care information for the exact material.
- Review grout colour against the approved tile sample.
- Agree how substitutions will be assessed and approved.
- Record spare-tile requirements before placing the order.
4. Resolve preparation and water exposure before tiling
Start with a site inspection of the surfaces receiving tiles. Look for visible damage, contamination, unevenness and movement, then have the installer identify what needs correction. Tiling over an unresolved base does not remove the underlying problem.
Tiles and grout are not a substitute for required waterproofing. A kitchen’s requirements depend on its design, construction and applicable rules. Have the responsible practitioner confirm the necessary treatment, including sink junctions, penetrations and any floor drainage, rather than copying a bathroom detail without checking it.
Keep waterproofing responsibilities separate from general language such as ready for tiles. Your 2026 scope should identify who confirms the substrate, who completes required protection and what evidence is retained before those surfaces are covered.
- Confirm that the substrate suits the proposed tiling system.
- Assign responsibility for repairs and levelling.
- Check required water-resistant or waterproofing treatment.
- Coordinate sink, tap and service penetrations.
- Retain preparation and waterproofing records where applicable.
5. Approve the layout before installation starts
Use a marked drawing and loose tiles to review the layout before adhesive is mixed. Check sightlines from the kitchen entry, the end of the splashback and the transition into adjacent rooms.
A centred layout is not automatically the best layout. Moving a starting line changes cuts at doorways, corners and cabinet ends. Review the whole kitchen rather than approving one attractive section that creates an awkward finish elsewhere.
Set 2 approval points in your workflow: one for the proposed layout and one for the first completed kitchen before repeating it. These are project controls, not a substitute for inspections during installation.
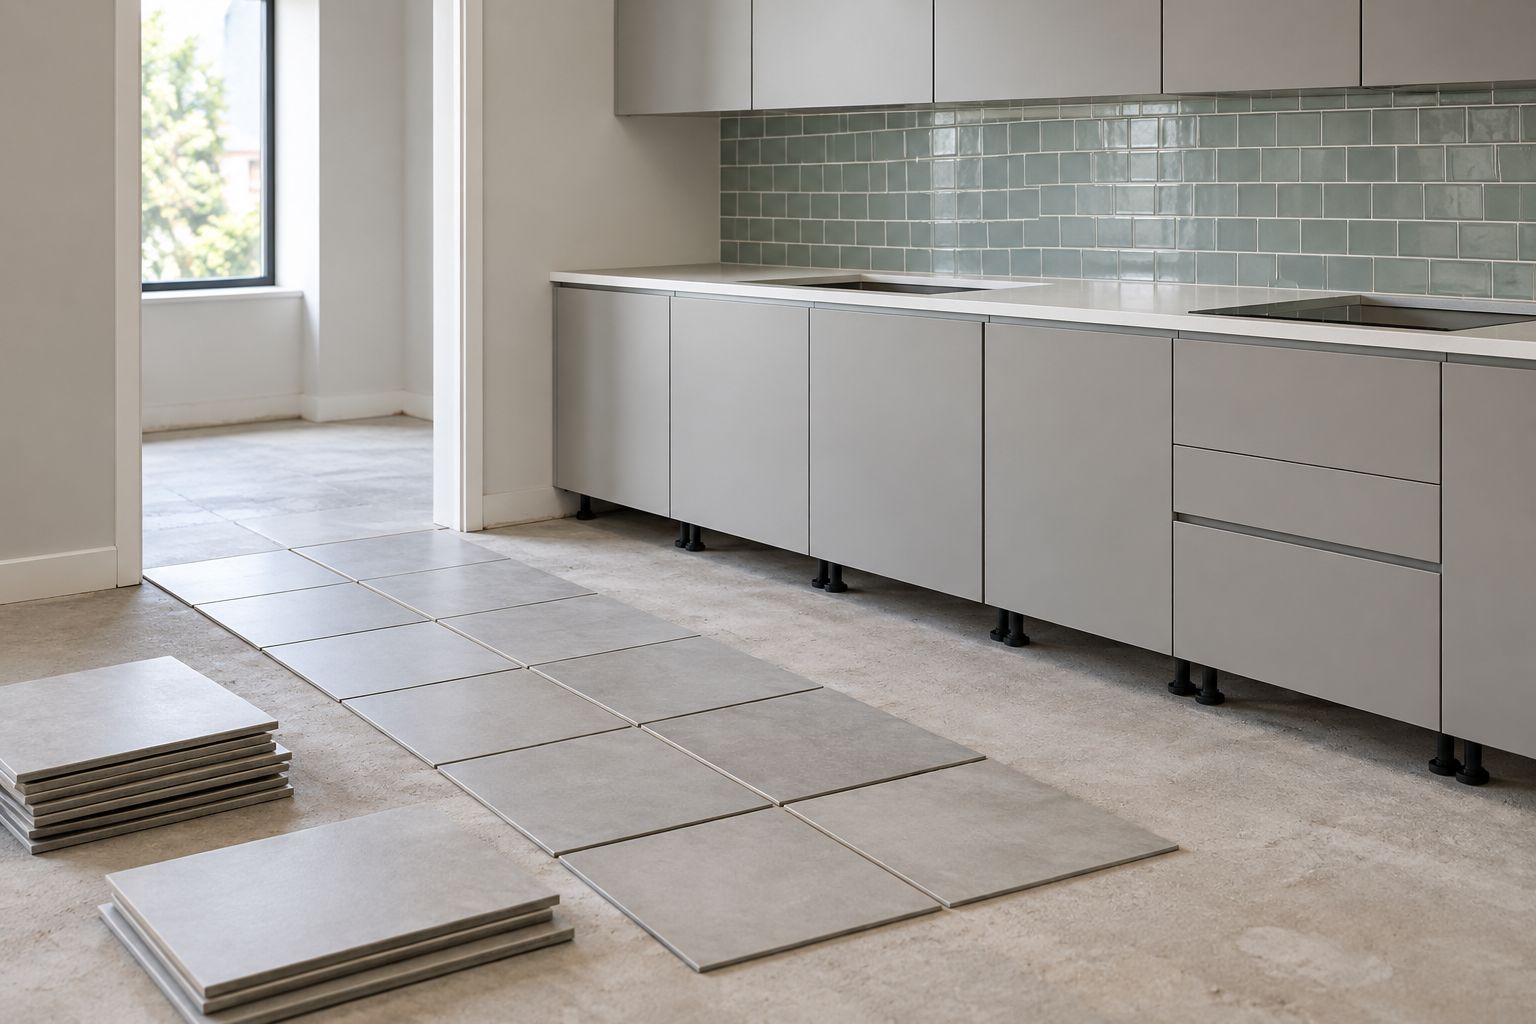
For repeated kitchens, photograph the approved arrangement and attach it to the current specification. A verbal instruction is difficult to compare with the next dwelling’s finish.
- Confirm the starting line and visible cut positions.
- Check splashback alignment around outlets and fittings.
- Approve edge trims and exposed tile ends.
- Review floor transitions and required movement joints.
- Record the approved layout before repeating it.
6. Coordinate the installation with other trades
Start with the builder’s programme and identify what must be complete before each tiling task. Floors and splashbacks do not necessarily belong at the same point in the sequence. Cabinet installation, benchtop fitting and service work all need coordination.
Do not impose a standard turnaround without checking the selected products and site conditions. Adhesives, grout, sealants and waterproofing systems have their own application and curing instructions. The programme must respect those instructions before following trades load or cover the work.
For your 2026 programme, nominate a decision-maker who can resolve site questions. Leaving an installer waiting for an edge detail does not protect the schedule.
- Confirm access, working areas and material storage.
- Agree the sequence for cabinets, benchtops and tiling.
- Schedule required preparation and inspection points.
- Follow product instructions before allowing subsequent work.
- Assign responsibility for protecting completed surfaces.
7. Inspect consistently and hand over useful records
Inspect each kitchen against the approved specification, not from memory. Check the visible finish, alignment, junctions and cleanliness, then record defects with a location and photograph. Refer technical acceptance questions to the relevant requirements and qualified practitioner.
Keep 3 handover records together: the finish schedule, the care instructions and the applicable installation records. Add spare-tile identification so future repairs start with the correct material rather than a visual guess.
For a 2026 handover, ensure records describe what was actually installed. A substituted tile needs an updated schedule; the original selection sheet is no longer enough.
- Compare tile and grout selections with the approved schedule.
- Check exposed edges, transitions and sealant junctions.
- Record defects and confirm their rectification.
- Collect applicable care and installation information.
- Label retained spare tiles by kitchen type and location.
Compare delivery options for your development
Choose the delivery arrangement around who will manage decisions and coordination. A tiling contractor’s installation scope and a builder’s coordination role are different responsibilities. Put both in writing before comparing proposals.
| Option | Best for | Main advantage | Key limitation |
|---|---|---|---|
| Developer-managed scope and appointments | Developers with an active site-management role | Direct control over selections and approvals | You coordinate dependencies and resolve gaps between trades |
| Builder-managed tiling package | Developers seeking one construction coordination point | Tiling sits within the builder’s programme | You still need a clear finish specification and approval process |
| Direct installation enquiry with Melbourne Tiling Group | Developers seeking Melbourne kitchen wall and floor tiling services | The stated service covers the relevant installation category | Confirm project coverage, preparation, supply and coordination responsibilities |
| Designer-led specification with a separate installer | Developments where finish selection needs dedicated design input | Separates selection decisions from installation execution | Designer, builder and installer must agree on buildable details |
No arrangement removes the need for site checks. Compare written inclusions, exclusions and approval responsibilities, not just the headline scope.
Discuss your kitchen tiling scope
Prepare your drawings, tile selections and site details for a kitchen wall and floor tiling enquiry.
Common mistakes property developers make
Repeating an unapproved detail
Installing every kitchen before checking the first repeats any unresolved cuts or junctions. Approve the first completed kitchen against the specification before using it as the reference for the remaining dwellings.
Ordering from drawings that no longer match site
Cabinet changes and revised benchtops can alter splashback dimensions. Confirm the latest drawings and site measurements before ordering materials or approving fabrication-dependent details.
Treating all preparation as included
A proposal that says kitchen tiling does not define repairs, levelling or required waterproofing. Name those tasks and allocate responsibility before work starts.
Choosing grout colour without considering upkeep
A grout colour affects the finished appearance and ongoing cleaning. Review the actual product’s application and maintenance requirements, especially when the development brief prioritises straightforward upkeep.
Leaving protection to the next trade
Completed floors remain exposed to construction activity unless protection is assigned. Agree who installs, maintains and removes suitable protection without damaging or contaminating the finish.
FAQ
What is the best starting point for kitchen tiling for property developers?
Start with a written specification for each kitchen type. Include tile selections, preparation responsibilities, layout approvals and trade sequencing before requesting comparable proposals.
Should kitchen floor tiles go under the cabinets?
Decide the floor tiling extent with the builder, cabinet installer and tiler before installation. Cabinet support, appliance clearances, finished floor levels and the agreed construction sequence all need consideration.
Do kitchen splashbacks need waterproofing?
Confirm the required water-resistant or waterproofing treatment for the specific kitchen design and applicable requirements. Tiles and grout alone do not replace required waterproofing, and sink junctions and penetrations need suitable detailing.
Are large tiles better for development kitchens?
Large tiles are not automatically better for development kitchens. Compare the proposed layout, substrate condition, handling requirements and resulting cuts before choosing a format.
Can the same tile specification be used across every dwelling?
Use a shared specification where the application and layout suit it. Record exceptions for different kitchen dimensions, floor conditions or design requirements instead of forcing an unsuitable detail to repeat.
Does Melbourne Tiling Group provide kitchen tiling?
Melbourne Tiling Group provides kitchen tiling as part of its residential and commercial wall and floor tiling services. Submit the project location, drawings and proposed finishes, then confirm the specific installation scope.
What should developers keep after kitchen tiling is finished?
Keep the installed finish schedule, care instructions and applicable installation records. Identify retained spare tiles by their actual reference and project location so later maintenance starts with the correct information.
One last thing
Photograph the junctions before they disappear. Preparation, penetrations and required waterproofing become difficult to inspect once tiles and fittings cover them. Add these photographs to your 2026 project records alongside the finished-kitchen images; the hidden work deserves its own record.


