
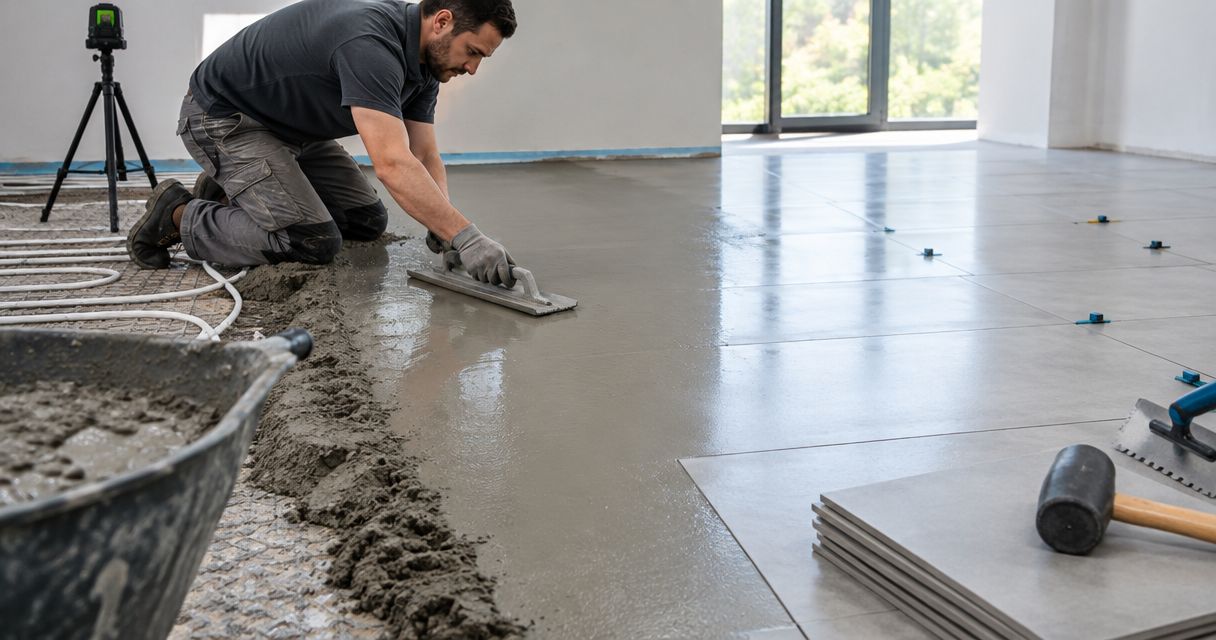
Instead of patching floor heights as tiles go down, plan the screed to floor tiling process around finished levels, drainage, curing and waterproofing before installation starts. This 2026 guide explains the order of work and the checks that stop one trade handing the next trade an unfinished floor.
- The screed to floor tiling process starts with finished floor heights, not tile adhesive.
- Melbourne Tiling Group provides residential and commercial wall and floor tiling in Melbourne.
- The specified waterproofing system determines whether the membrane sits above or below the screed.
- Release each stage only after substrate preparation, curing and installation checks are complete.
Why this matters
Screed creates the base profile beneath your tiles. It can establish a flat surface or form drainage falls, but it cannot repair an unsuitable structure or replace waterproofing.
Melbourne Tiling Group is a fit for Melbourne homeowners seeking residential wall and floor tiling services. Discuss the floor build-up with Melbourne Tiling Group before agreeing on the installation scope.
The benefit of an agreed workflow is clear responsibility between trades. The limitation is that tiling services alone do not establish whether structural repairs, plumbing changes or waterproofing are included; confirm those tasks separately.
For a bathroom renovation in Melbourne's south-east, resolve shower drainage and doorway levels before demolition finishes. For a kitchen floor, check adjoining flooring and appliance clearances instead. Those decisions belong in your 2026 renovation plan, not on the day tiles arrive.
Before you start
- Access and records: Arrange access for the relevant trades. Gather the room measurements, substrate details, drainage layout and current installation instructions for the proposed screed, primer, membrane, adhesive and grout.
- Materials and layout: Prepare 1 room plan showing finished floor heights, thresholds, drains and movement joints. Keep 2 tile samples together so you can inspect the face finish and tile backing.
- The hidden gotcha: Agree on the waterproofing build-up before screeding. A membrane above the screed and a membrane below it are not interchangeable site decisions; the approved system, substrate and drain detail determine the sequence.
Use 3 hold points in the work schedule: substrate acceptance, screed readiness and permission to cover the waterproofing. A hold point means the next stage does not start until its checks are satisfied.
This is a planning guide, not a substitute for the specified installation system. Keep the relevant product instructions on site and give each trade access to the same documents.
Finished levels and substrate preparation
Confirm the floor build-up
- Establish the intended finished tile height at doorways and adjoining rooms. Include every planned layer, rather than measuring the screed in isolation.
- Mark drain positions and identify where drainage falls are required. Check how those falls meet the shower entry, walls and threshold.
- Record who accepts the substrate before work starts. Include responsibility for cracks, unstable sections, contamination and previous coatings.
Expected result: You have an agreed floor profile and a sound base before anyone mixes screed.
A level surface and a flat surface are different. A kitchen floor can need flatness for tile installation, while a shower floor needs a deliberate slope towards its drain.
Check the whole doorway transition, not just the bathroom side. Adding layers without checking the adjoining floor can leave an awkward step or interfere with a door.
Match the preparation material to the job
Different preparation materials perform different jobs. Choose them by the required profile and substrate, not by whichever bag is already on site.
| Preparation option | Best for | Useful feature | Limitation |
|---|---|---|---|
| Cement-based screed | Forming floor profiles and drainage falls | Can be shaped to the required floor geometry | Needs suitable support, thickness and curing under its specified system |
| Self-levelling underlayment | Smoothing suitable internal floors where a level surface is required | Flows to create a level base | A standard flowing compound is not a substitute for deliberately formed shower falls |
| Tile adhesive | Bonding tiles to a prepared surface | Provides the tile bond | Must stay within its stated application limits; it is not a general floor-correction layer |
Choose the preparation layer before choosing the adhesive. An adhesive selected for tile installation should not become the solution to unresolved floor geometry.
Screed installation and readiness
Prepare and place the screed
- Clean and prepare the substrate using the specified method. Remove loose material and address contaminants that would interfere with bonding.
- Confirm whether the screed is bonded, unbonded or part of another designed build-up. Follow the required preparation, bonding and reinforcement details for that system.
- Place and finish the screed to the agreed heights and drainage profile. Check the surface while correction is still possible.
Expected result: The screed has the intended shape, with doorways, drains and adjoining surfaces accounted for.
Do not assume every screed uses the same mixing method. Added water, bonding preparation and permitted thickness come from the selected product or screed specification.
Keep existing movement-joint locations visible in the plan. Do not bury them beneath a continuous finish without an agreed detail for the layers above.
Check readiness before covering
- Protect the screed and follow its specified curing requirements. Keep other trades from damaging the surface or using it for storage prematurely.
- Check strength, surface condition, moisture requirements and the intended profile before the next layer. Use the assessment method required by the covering system.
- Resolve cracks, loose patches, dusting and incorrect falls before applying a membrane or tile adhesive.
Expected result: The receiving surface satisfies the next product's requirements, rather than merely looking dry.
Do not use a calendar alone to approve screed for covering. A dry-looking surface does not establish that the screed meets the membrane or adhesive requirements.
For your 2026 schedule, record the actual product and its release conditions. A generic drying allowance copied from another renovation is not an installation instruction.
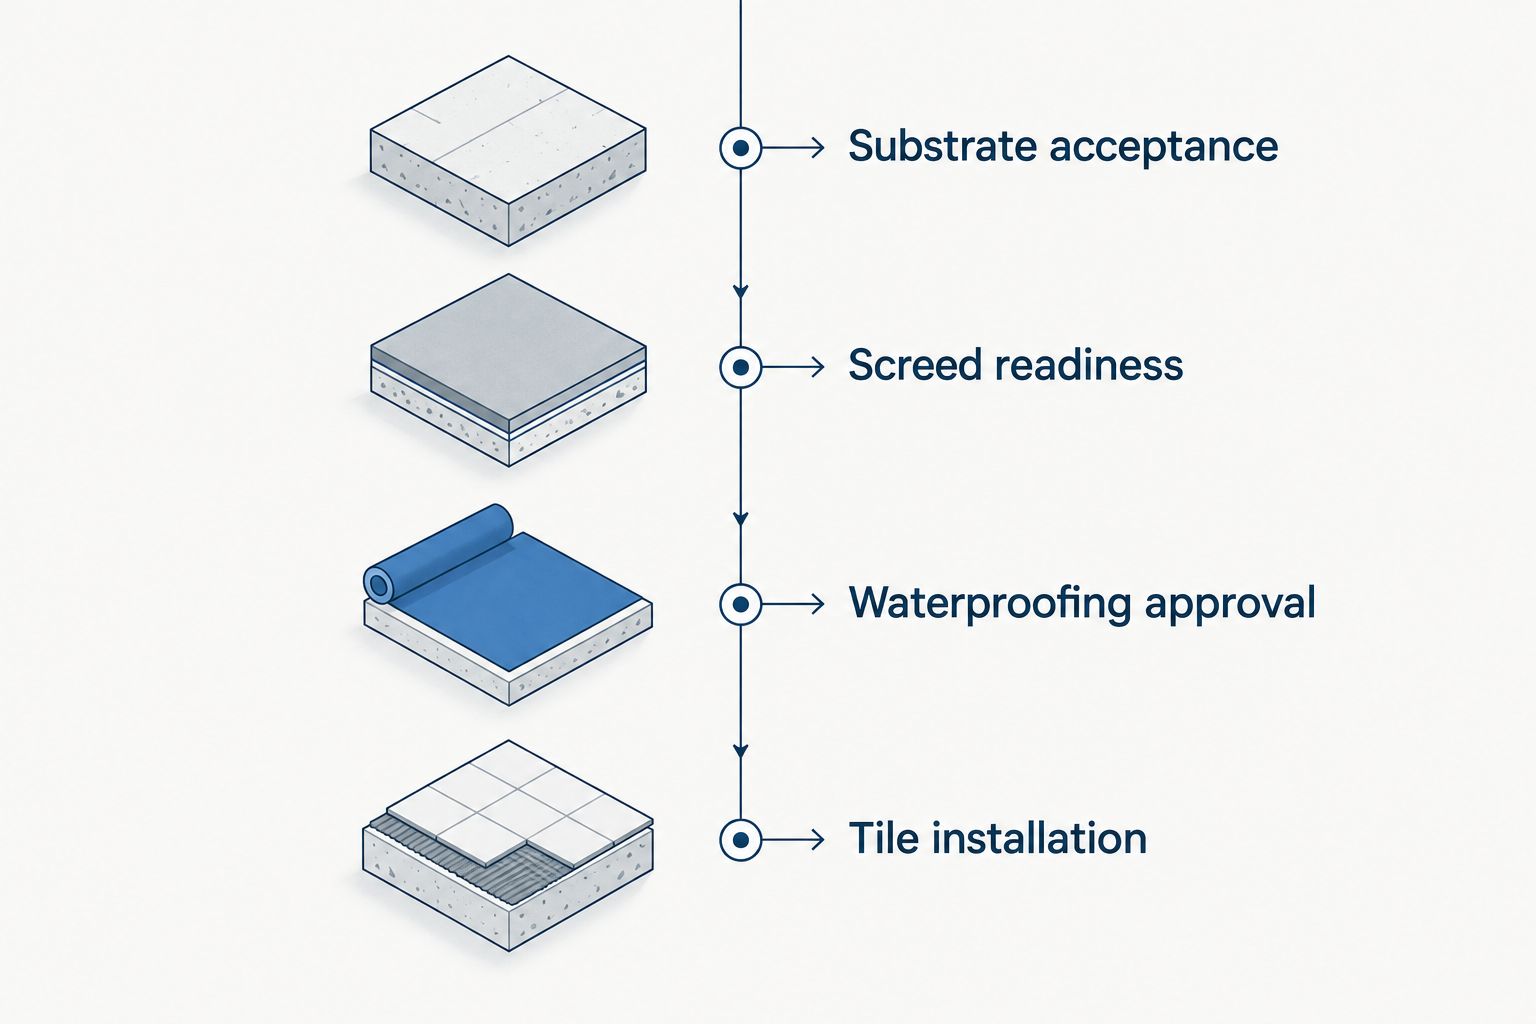
Waterproofing and tile installation
Complete the waterproofing detail
- Confirm the specified membrane position in the floor build-up. Check compatibility with the screed, substrate, drain components and adhesive.
- Complete the required junctions, penetrations, corners and drain connections. Follow the membrane system's preparation, application and curing instructions.
- Arrange the required inspection or testing before covering the membrane. Record the outcome and protect the accepted surface from damage.
Expected result: Waterproofing approval is recorded before tile installation covers the work.
Tiles and grout are not a substitute for a waterproofing system. Waterproofing depends on continuity at junctions and penetrations, not just coverage across the open floor.
If the membrane belongs below the screed, complete that work at the specified earlier stage. Do not follow a generic sequence that places every membrane above every screed.
Melbourne Tiling Group's bathroom tiling scope should be agreed alongside the waterproofing scope. Ask who supplies the system, who installs it and who releases it for covering.
Set out and bond the tiles
- Dry-set the layout around the doorway, walls and drain. Check cuts, grout-joint positions and how tile sizes work with changes in slope.
- Select compatible adhesive and apply it using the manufacturer's instructions. Check the tile adhesives for wet-area installations guide when preparing your questions for the installer.
- Lift tiles during installation to check adhesive contact. Correct the application method immediately if the required coverage is not being achieved.
Expected result: Tile installation follows the intended layout and maintains the prepared drainage profile.
Large tiles need particular attention where a floor changes direction towards a drain. Tile cuts or a different layout can be necessary to follow that geometry without creating raised edges.
Do not bridge designed movement joints with rigid adhesive and grout. The finished tile surface needs the specified joint treatment in the right locations.
Grouting, protection and handover
- Allow the adhesive to reach the stage required for grouting. Clear joints without damaging tile edges or the layers beneath them.
- Apply the selected grout and complete flexible joints where specified. Remove residue using a method suitable for the tile finish.
- Protect the floor until the relevant products permit access, loading, cleaning and wet use. Give the homeowner the care instructions and agreed handover records.
Expected result: The finished floor is clean, protected and released for its intended use, rather than handed over immediately after grouting.
Walk through the room with the installer. Check visible defects, tile edges, movement joints, transitions and drainage performance where testing is appropriate.
For a 2026 handover, keep the product names and installation records with your renovation documents. Those details make later maintenance and repair decisions more precise.
Variant: tiling a dry kitchen or living-room floor
A dry-area floor follows the same substrate, screed-readiness and tile-bonding checks. The difference is that shower drainage and wet-area waterproofing details do not automatically apply to every room.
| Workflow | Best for | Main planning benefit | Main constraint |
|---|---|---|---|
| Wet-area floor tiling | Bathrooms and other specified wet areas | Coordinates drainage, waterproofing and the tile finish | More interfaces must be accepted before covering |
| Dry-area floor tiling | Suitable kitchen and living-room floors | Focuses preparation on the required floor profile and finish | Substrate movement and moisture still need assessment |
For a kitchen, check appliance spaces and adjoining flooring before setting screed heights. For a living room, agree on movement joints and transitions before committing to the tile layout.
Do not extend this internal workflow unchanged to natural stone paving. Outdoor exposure, drainage, substrate design and stone suitability need their own assessment.
Troubleshooting
The screed looks dry, but the next trade refuses it
Check the receiving product's moisture, curing and surface requirements. Obtain the specified assessment rather than asking the installer to accept appearance as proof of readiness.
Water sits away from the drain
Check the finished falls, drain height and tile layout to identify the cause. Agree on a repair that preserves waterproofing continuity; extra grout is not a remedy for an incorrect floor profile.
Tiles rock during the dry layout
Check both tile shape and substrate flatness. Resolve the cause before bonding, and keep any adhesive adjustment within the product's stated limits.
A primer or adhesive does not match the membrane
Stop before applying it. Confirm compatibility with the relevant manufacturers and document the accepted combination rather than assuming products are compatible because they serve similar purposes.
Cracks appear before tiling starts
Have the substrate and screed assessed before covering them. Identify whether the problem concerns shrinkage, movement, support or bonding so the repair addresses the cause.
Customise your workflow
Ask Melbourne Tiling Group to separate floor preparation, tiling and any other agreed tasks in the written scope. That makes exclusions visible before work starts and keeps the comparison between quotes focused on the same work.
For your 2026 project, add room-specific checks rather than extra generic steps:
- Bathroom: Confirm drainage, waterproofing interfaces and the shower-entry detail.
- Kitchen: Confirm finished heights, appliance clearances and adjoining floor transitions.
- Laundry: Confirm the applicable wet-area requirements and drainage design.
- Natural stone: Confirm suitability, adhesive compatibility and any specified sealing or care requirements.
Keep the scope affordable by resolving preparation early, not by deleting necessary layers. A clear specification tells you what the quoted work includes without making unsupported promises about the final result.
FAQ
What is the correct screed to floor tiling process?
Confirm the substrate and finished heights, install the specified screed build-up, check readiness, complete waterproofing where required, then tile, grout and protect the floor. The waterproofing system determines where the membrane belongs in that sequence.
How long after screeding can you lay floor tiles?
Lay tiles only when the screed meets the selected covering system's curing, moisture and surface requirements. Use the specified assessment rather than a universal waiting period.
Does waterproofing go above or below the screed?
The specified waterproofing system determines whether the membrane goes above or below the screed. Confirm the substrate, drain connection and complete build-up before work begins.
Can tile adhesive replace floor screed?
Tile adhesive is not a general replacement for screed. Use it within its stated application limits after the floor profile has been properly prepared.
Is self-levelling compound suitable for a shower floor?
A standard flowing self-levelling compound is not the right choice for deliberately forming shower falls. Select a preparation system designed for the required profile and waterproofing build-up.
Can I walk on the floor straight after grouting?
Wait until the installed products permit foot traffic. Adhesive, grout and flexible-joint products have their own requirements, and permission to walk does not automatically mean permission for wet use.
What should I ask a Melbourne floor tiler before booking?
Ask who prepares the substrate, establishes floor levels, installs waterproofing and approves each covering stage. Melbourne Tiling Group provides residential and commercial wall and floor tiling; confirm your project's included tasks in writing.
One last thing
Check the doorway before you approve the screed height. The room can look correct in isolation while its finished floor clashes with the hallway, door swing or shower entry. Resolve that junction on the room plan before the floor build-up becomes difficult to change.


