

Tiling for construction companies is the planning and installation of tiled surfaces to deliver finished spaces that meet the project specification and handover requirements. Unlike a standalone homeowner job, a building project needs clear trade responsibilities, coordinated access and inspections before finished work hides the layers underneath.
- Tiling for construction companies starts with an agreed scope, not a tile selection.
- Melbourne builders should approve waterproofing responsibilities and inspection points before wet-area tiling begins.
- Compare installation proposals against the same preparation, set-out and handover requirements.
- Keep bathroom tiling, kitchen splashbacks and floor tiling coordinated with adjoining trades.
Why tiling matters for construction companies
Tiles finish the surface, but the result depends on work completed before installation. A bathroom needs coordinated drainage, suitable preparation and waterproofing. A kitchen splashback needs agreed cabinetry and power-point positions. Floor tiling needs finished levels that work with doors and adjoining surfaces.
For your 2026 construction programme, treat those decisions as prerequisites, not details the tiler resolves on arrival. The guide to tile adhesives for wet-area installations explains one material choice that belongs in that planning stage.
A tidy tile surface does not prove the underlying work is correct. Your site records need to show what was checked before it became concealed.
Melbourne projects also need practical access planning. For a south-east suburban renovation, confirm where materials can be unloaded, where cutting can happen and how occupied areas will stay separated from the work. Put those arrangements in the job brief rather than leaving them to the installation day.
Plan the job from scope to handover
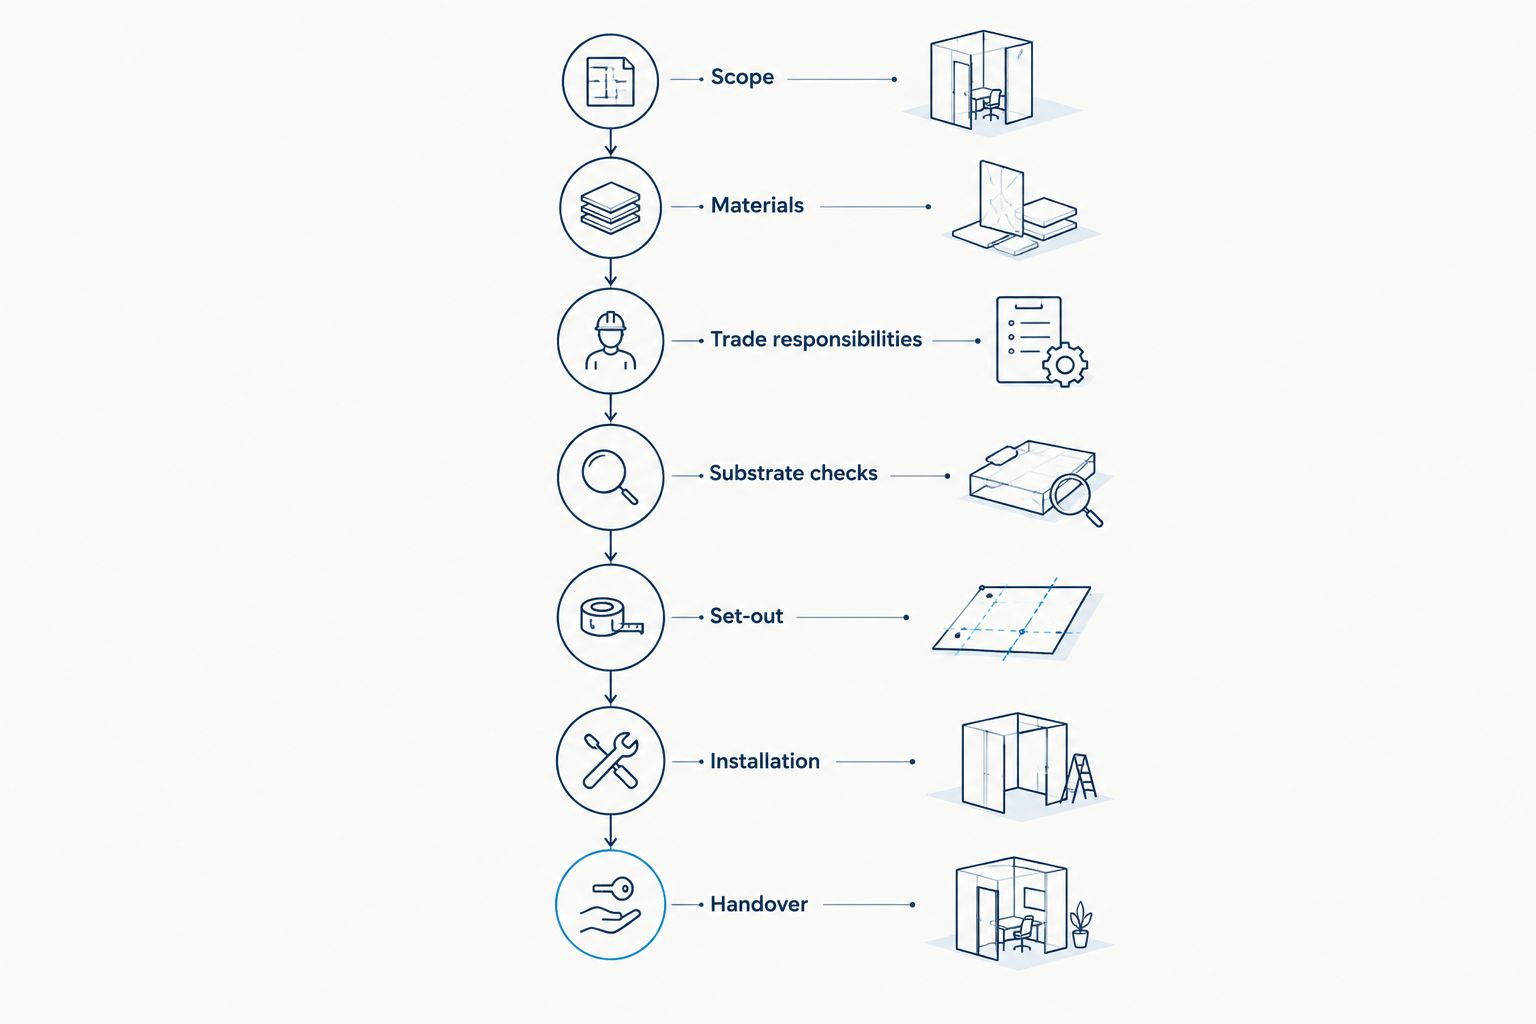
Use a shared checklist with these stages: Scope, Materials, Trade responsibilities, Substrate checks, Set-out, Installation and Handover. A spreadsheet and marked-up drawings are enough to start; the essential part is keeping approved decisions in one place.
Define the scope room by room
Start with a room schedule drawn from the construction documents. Record which walls and floors receive tiles, where finishes stop and what happens at adjoining materials. Do not rely on a general instruction such as bathroom tiling included.
Separate installation from preparation. Demolition, substrate repairs, screeding, waterproofing and waste removal need named responsibilities, whether they sit inside or outside the tiling package. This makes proposals comparable and gives your site supervisor a usable checklist.
For repeated bathrooms, approve 1 reference room before releasing the remaining layouts. Treat that room as an agreed example, not permission to ignore differences elsewhere.
- Mark tiled areas and termination points on drawings.
- Identify niches, returns, skirtings, steps and exposed edges.
- List preparation tasks separately from tile installation.
- Record inclusions, exclusions and responsibility for waste.
- Nominate who approves scope changes before work proceeds.
Confirm materials before booking installation
Build a material schedule using the drawings and selected finishes. Confirm the tile, adhesive, grout, sealant and trim requirements together. A tile selection alone does not define a complete installation system.
Ask for manufacturer documentation where compatibility matters, particularly around waterproofing, natural stone and wet areas. Do not substitute an adhesive or grout simply because it is already on site. Get the substitution reviewed against the intended use and the other specified materials.
For a 2026 project with several finish selections, keep approved samples beside the current schedule. Record changes against the room affected so an earlier selection does not reach the installer by mistake.
- Confirm tile dimensions, finish and intended application.
- Check adhesive suitability for the tile and substrate.
- Check compatibility with the specified waterproofing system.
- Approve grout colour, joint appearance and edge trims.
- Agree who supplies materials and checks deliveries against selections.
Assign trade responsibilities before work starts
Use a simple responsibility matrix first. Put the builder, tiler, plumber, waterproofer and other relevant trades against each task. Record who performs the work, who checks it and who authorises the next stage.
Melbourne Tiling Group is best suited to Melbourne builders seeking residential and commercial wall and floor tiling. Bring the tiling contractor into scope discussions rather than asking the installer to resolve missing decisions after mobilisation.
A direct discussion with the installation contractor is the faster route to confirming tiling scope than circulating assumptions between trades. Keep waterproofing and other adjoining responsibilities explicit; a wall and floor tiling brief must not leave those boundaries implied.
- Assign preparation, screeding and waterproofing responsibilities.
- Confirm who coordinates drains, penetrations and fixture positions.
- Nominate the person authorised to approve layout changes.
- Record inspection responsibilities before concealed work proceeds.
- Agree how instructions reach the installer and site supervisor.
Inspect substrates and waterproofing before covering them
Walk the work area with the responsible trades before tiling starts. Check that the substrate is suitable for the proposed installation and that unresolved damage, movement or contamination has been addressed. A clean-looking surface is not the same as an accepted substrate.
For wet areas, verify the waterproofing work against the approved design, applicable requirements and manufacturer instructions. Confirm the required records before covering the membrane. Tiles and grout do not replace waterproofing.
Use 3 hold points in your inspection plan: substrate acceptance, waterproofing acceptance and finished-work acceptance. Add further checks where the design or project requirements call for them. These are planning checkpoints, not a substitute for required inspections.
- Record substrate condition and outstanding repairs.
- Confirm falls and drainage arrangements against the design.
- Check waterproofing details around junctions and penetrations.
- Retain inspection records and relevant product documentation.
- Release installation only after outstanding issues are resolved.
Approve the set-out before spreading adhesive
Mark the proposed layout on site before committing to installation. Check the view from doorways, the relationship to fixtures and the cuts at corners. A centred layout is not automatically the right layout if it produces awkward cuts elsewhere.
In a bathroom, coordinate floor joints, wall joints, niches and drain positions. For a kitchen splashback, check cabinetry, benchtops, power points and exposed ends together. Large floor tiles also need a layout that considers transitions between rooms.
Choose 1 layout approver for each work area. That person should resolve conflicting instructions before the installer starts, particularly where a homeowner is also making finish decisions.
- Mark starting lines and visible termination points.
- Review cuts around doors, fixtures and corners.
- Confirm trim placement and exposed-edge treatment.
- Identify movement-joint locations from the installation design.
- Photograph the accepted set-out with its drawing reference.
Sequence installation around other trades
Put tiling into the construction programme with its actual prerequisites. The work area needs to be ready, the approved materials need to be confirmed and adjoining trades need to understand access restrictions. Do not make the tiler work around unresolved tasks that affect the finished surface.
For your 2026 programme, use the selected products' instructions to establish curing and access requirements. There is no single waiting period that covers every adhesive, grout, membrane and site condition.
After installation, protect the finish from later work. Agree the protection method and removal responsibility so a finished floor does not become an unprotected route for equipment and materials.
- Confirm site readiness before the installation booking.
- Keep plumbing and electrical changes clear of accepted work.
- Record product-specific curing and access requirements.
- Prevent contamination from cutting, painting and other trades.
- Assign protection, cleaning and damage-reporting responsibilities.
Inspect the finish and close the records
Inspect the completed work against the approved scope and set-out, not a memory of earlier conversations. Check appearance, transitions, edges, joints and drainage where relevant. Record defects clearly enough that the responsible trade can identify the exact location.
Keep 1 handover register for each project. Include accepted selections, installation records, inspection outcomes and care instructions. This gives your supervisor and client a shared reference rather than scattered messages and photographs.
For 2026 handovers, separate workmanship defects from cleaning, protection damage and later trade damage. Record what needs correction and who owns the action without guessing at the cause.
- Inspect tile alignment, cuts, trims and finished transitions.
- Check sealant joints and drainage against project requirements.
- Record defects by room, location and required action.
- Collect relevant care and maintenance instructions.
- Close outstanding actions before accepting the tiling package.
Compare tiling delivery options
Choose the arrangement that makes responsibilities clearest, not the one with the shortest proposal. Each option below can suit a project, but each leaves coordination work somewhere. Assess that work before you appoint the contractor.
| Option | Best for | Main advantage | Key limitation |
|---|---|---|---|
| Builder-managed separate trades | Builders with site supervision capacity | Direct control over preparation, waterproofing and installation appointments | The builder must manage interfaces and resolve scope gaps |
| A combined preparation and installation package | Projects seeking fewer trade interfaces | Related tasks can sit under a clearly defined scope | Package boundaries still need checking; do not assume waterproofing is included |
| Melbourne Tiling Group wall and floor tiling | Melbourne construction companies seeking residential or commercial tiling | The stated services cover kitchen, bathroom and floor tiling | Preparation, waterproofing and project-specific responsibilities need written agreement |
For a small renovation, separate appointments can give you direct control. On a project with repeated rooms, an agreed installation package can simplify instructions. Neither arrangement removes the need to inspect concealed work.
Compare proposals against the same drawings and responsibility schedule. If one excludes substrate repairs and another includes them, resolve that difference before deciding which offers better value.
Discuss your tiling scope
Discuss residential or commercial wall and floor tiling with Melbourne Tiling Group.
Common mistakes construction companies make
Comparing proposals with different preparation scopes
A short installation proposal can leave substrate repairs, screeds, trims or protection to someone else. That is not a like-for-like comparison with a proposal covering those tasks. Issue the same scope schedule to every contractor and have exclusions identified against it.
Letting fixture changes bypass the tiling team
A moved vanity, drain or power point can affect set-out and finished details. Tell the installer before work continues, not after the revised fixture arrives. Mark the change on the current drawing and confirm whether accepted waterproofing or preparation needs review.
Treating waterproofing as a finished-surface check
An inspection after grouting cannot show every detail underneath the tiles. Make waterproofing acceptance a separate checkpoint before covering it. Keep the relevant records attached to the room or work area rather than relying on an undocumented verbal approval.
Applying the bathroom specification outdoors
An internal wall tile specification does not settle the requirements for paving, terraces or pool surrounds. Outdoor areas need their own assessment of exposure, drainage, substrate and intended use. Natural stone also needs material-specific installation and care decisions rather than assumptions carried over from porcelain.
Leaving finished tiles unprotected
Later trades can damage completed work before the client sees it. Agree protection and access controls as part of the programme. Inspect the finish before protection goes down and again when it comes up, so damage is recorded at the right stage.
FAQ
What's the best way to organise tiling for construction companies?
Start with a room-by-room scope and a written responsibility schedule. Confirm materials, substrate acceptance, waterproofing checks and set-out before installation begins.
Does a tiling contractor automatically handle waterproofing?
No, waterproofing must be expressly assigned in the project scope. Confirm who performs it, who checks it and which records are required before tiling covers the work.
Can construction companies use Melbourne Tiling Group?
Melbourne Tiling Group provides residential and commercial wall and floor tiling for construction companies and homeowners. Discuss the project location, drawings and installation scope before confirming the arrangement.
Is one tiling package better than separate trades?
A combined package suits projects seeking fewer interfaces, while separate trades suit builders with the capacity to coordinate them. Both arrangements need clear preparation, waterproofing and inspection responsibilities.
How long should a builder allow before other trades walk on new tiles?
Use the selected installation products' curing and access instructions to set the programme. Confirm site conditions and protection requirements with the responsible contractor rather than applying a standard waiting period.
Should builders approve a bathroom tile layout before installation?
Yes, approve the set-out before adhesive is applied. Review cuts, niches, drain positions, exposed edges and the relationship between wall and floor joints.
What should a tiling handover include?
A tiling handover should include accepted selections, relevant inspection and installation records, care instructions and a closed defect list. Keep the documents tied to the rooms or work areas they cover.
One last thing
Ask for photographs of accepted concealed work, not just photographs of the finished bathroom. Finished tiles show the appearance; the earlier records help document what was checked underneath.
For your next 2026 project, send Melbourne Tiling Group the room schedule and marked-up drawings before discussing installation dates. A clear scope gives the tiling contractor something concrete to assess and gives your site team something concrete to manage.


